
How to Install KittoX
Supported Delphi versions and editions
Kittox compiles and runs on Delphi 10.4 Sydney and later — the framework ships ready-made packages and example projects for 10.4, 11, 12 and 13 (framework package folders Packages/D10_4, D11, D12, D13). A single codebase targets both Win32 and Win64 for your application; only the framework design-time package bitness depends on the IDE (32-bit up to Delphi 11, 64-bit-capable from Delphi 12 — see the note below).
Any edition — Professional included
Kittox works with every Delphi edition, Delphi Professional included. The framework itself uses no Enterprise-only feature; the only thing to plan is how you reach a client/server database:
- Delphi Enterprise / Architect bundle the FireDAC and dbExpress client/server drivers (SQL Server, Oracle, PostgreSQL, MySQL, remote Firebird…). On these editions you connect out of the box with the built-in
EF.DB.FD(FireDAC) orEF.DB.DBX(dbExpress) adapters — no extra component required. - Delphi Professional ships FireDAC/dbExpress with local/embedded drivers only (SQLite, InterBase ToGo). To reach a client/server DBMS on Professional you use a third-party data-access provider, and Kittox already supports one: ODAC (Devart Oracle Data Access Components) through the
EF.DB.ODACadapter (ClassIdODAC). It gives full client/server Oracle access on any edition, Professional included — just reference the unit inUseKitto.pasand add anODACconnection block. Other Devart DAC products (SDAC for SQL Server, PgDAC for PostgreSQL, …) follow the same adapter pattern and can be integrated the same way.
In short: Delphi Professional + a third-party DAC such as ODAC = full client/server Kittox, with no Enterprise licence required. See Configuring the Databases for the connection blocks and adapter selection.
There are two ways to install Kittox into your Delphi environment:
Option 1: Setup Installer (recommended)
The setup installer provides the fastest way to get started. It includes the KIDEx visual IDE (Enterprise edition) and installs all source files, examples, templates and resources.
The setup builds the packages and configures the IDE for you
The setup can compile the framework packages automatically for each Delphi version you select, create the KITTOX_HOME environment variable and register the global IDE library search paths — so KIDEx, the examples and your own projects compile out of the box, with no manual step. If you clone from Git instead, you do these steps by hand.
Download
Download the latest setup from GitHub:
The setup step by step
The wizard is short and asks you four things: which Delphi versions to install into, where, what to install, and what to do when it is done. It needs no administrator rights — it installs for the current user and writes only under HKEY_CURRENT_USER.
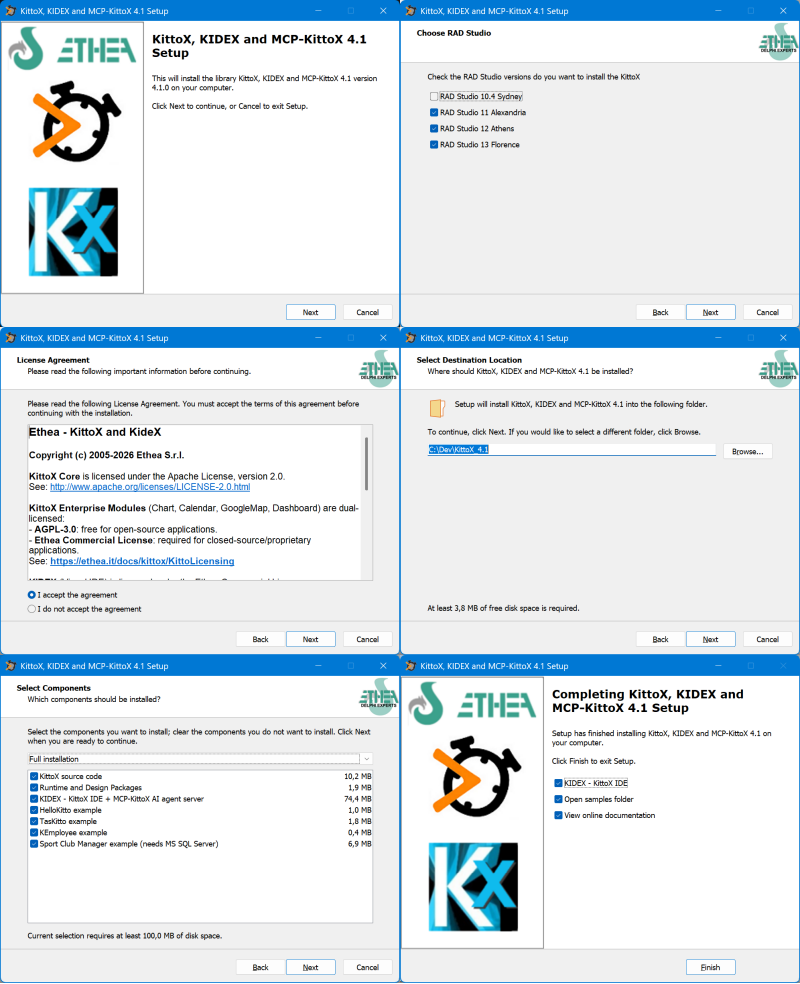
1. Welcome
Tells you what is about to be installed — the Kittox library, the KIDEx IDE and the MCP-KittoX agent server — and the exact version. Nothing to choose: Next to continue, Cancel to quit.
2. Choose RAD Studio
The most important page, and the one that drives everything version-specific that follows. It lists the RAD Studio versions Kittox supports — 10.4 Sydney, 11 Alexandria, 12 Athens, 13 Florence — and the setup detects from the registry which of them are actually on the machine:
- Versions not installed are greyed out and cannot be selected (in the screenshot, RAD Studio 10.4 Sydney).
- The installed ones are pre-checked. Clear the ones you do not want Kittox registered into — the packages are compiled and the IDE configured once per checked version, so unchecking one makes the install shorter.
- A version that is installed but has never been opened is flagged Need open it first: RAD Studio creates its per-user profile — where the environment variable and the library paths go — only on its first run. Start that IDE once, then run the setup again.
- A version newer than the ones the shipped packages officially target is flagged Unofficial support: it is selectable, and it normally works, but it has not been validated.
If you clear every version the setup asks for confirmation before going on: you still get sources, examples and KIDEx, but no compiled packages and no IDE configuration — you would then do the manual steps yourself.
3. License Agreement
The licensing terms of the three tiers: Core under Apache 2.0, the Enterprise modules dual-licensed AGPL-3.0 / Commercial, KIDEx commercial only. You must choose I accept the agreement to continue. The full text is on the Licensing page.
4. Select Destination Location
Where everything goes — by default C:\Dev\KittoX_4.1 on the system drive, changeable with Browse….
The version is part of the folder name on purpose
The default folder carries the version (KittoX_4.1), the setup does not reuse the folder of a previous install and does not complain if the folder already exists. That is what lets several Kittox versions live side by side on the same machine. The folder you pick here becomes KITTOX_HOME.
5. Select Components
A drop-down with the three standard installation types — Full, Compact, Custom — and the checkboxes below it. Ticking or clearing anything by hand switches the drop-down to Custom; the footer keeps the required disk space up to date (about 100 MB for a full install).
| Component | What it installs | Full | Compact |
|---|---|---|---|
| KittoX source code | The framework sources, Home (templates, resources, icons, locale) | ✓ | ✓ |
| Runtime and Design Packages | The .dpk/.dproj of KittoXCore, KittoXEnterprise and KittoXIDE for every supported Delphi | ✓ | ✓ |
| KIDEx - KittoX IDE + MCP-KittoX AI agent server | The visual IDE and the MCP server — the bulk of the download | ✓ | ✓ |
| HelloKitto example | The simplest example | ✓ | — |
| TasKitto example | The activity-tracking example | ✓ | — |
| KEmployee example | The employee example | ✓ | — |
| Sport Club Manager example | A real application in production — needs a MS SQL Server to run | ✓ | — |
| Test suite (DUnitX) | Sources, project and data of the framework test suite | ✓ | — |
So Compact gives you the framework, the packages and the IDE without examples and tests; Full adds everything. KIDEx is in every type, and can be cleared if you only want the framework.
The wizard also offers to create a desktop icon for KIDEx — cleared by default.
6. Completing the setup
The last page confirms the install and offers three actions, all pre-selected; clear the ones you do not want before pressing Finish:
- KIDEx - KittoX IDE — launches the IDE. On a first install it starts unregistered and opens its License Manager, where you request the 30-day trial.
- Open samples folder — opens the
Examplesfolder of the installation in Explorer. - View online documentation — opens this documentation site in your browser.
What the setup does for you
Besides copying the files you selected, the setup automatically:
- Compiles the framework packages (Core + Enterprise + IDE) for every Delphi version you checked, for Win32 and Win64
- Creates the
KITTOX_HOMEenvironment variable pointing at the install folder - Associates the
.kprojproject files with KIDEx, so a double-click opens the project in the IDE - Registers the global library search paths in each Delphi IDE (Win32 and Win64):
$(KITTOX_HOME)\Lib\D13\Win32
$(KITTOX_HOME)\Source\EF
$(KITTOX_HOME)\Source\ThirdParty
$(KITTOX_HOME)\Source\ThirdParty\MarkdownProcessor\source
$(KITTOX_HOME)\Source
Fast link vs. debugging the framework sources
The first entry — $(KITTOX_HOME)\Lib\D{ver}\Win32 (or \Win64) — points at the pre-compiled DCUs, so your projects link fast. If you want to step into and debug the Kittox sources, remove that first entry from the IDE library path: Delphi will then compile the framework from source.
Third-party libraries and the library path
Source\ThirdParty is installed in full, but only its root and MarkdownProcessor\source go on the library path: they hold Kitto.-prefixed forks that cannot clash with other copies. The libraries shipped with their upstream unit names in their own subfolders — delphi-neon, delphi-jose-jwt — are not added, so they never override a version you already have. Add their Source folders to the search path of the projects that need them (e.g. the JWT envelope needs delphi-jose-jwt\Source\Common and \Source\JOSE), as the example projects do. See Licensing.
The Material Design icons survive an uninstall
The setup ships the full Material Design icon set (~2100 SVGs across 5 styles) and extracts it into Home\Resources\icons — a slow, one-time step. To avoid re-extracting it on every update, the uninstaller deliberately keeps that folder: a later reinstall in the same location reuses the existing icons, and re-extracts only when the icon-package version actually changes.
KIDEx trial license
KIDEx is part of the Enterprise Edition. At first launch it opens its License Manager, where you can request a 30-day trial online: fill in your company name and developer e-mail, press Request Trial…, and the activation codes are fetched and applied at once — no e-mail exchange needed.
At events such as Delphi Day and ITDevCon, Ethea hands attendees a special coupon that extends the trial to 90 days: type it in the Special Coupon field before requesting the trial.
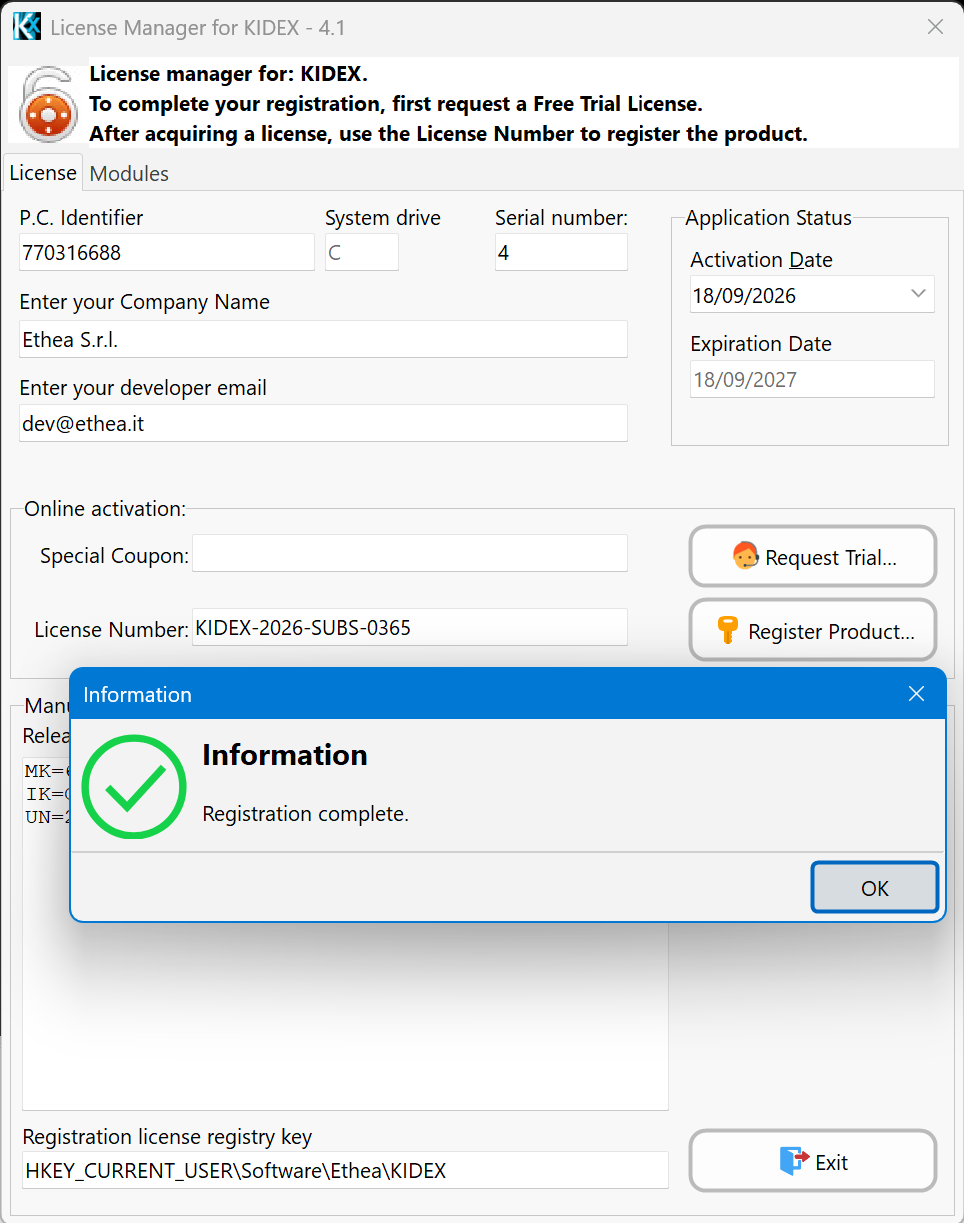
After the trial period, KIDEx requires a commercial license, which you activate from the same window with the license number you receive. See Licensing & Registration for the whole procedure. The Kittox framework itself (Core + Enterprise modules) remains fully functional without KIDEx.
After installation
Once installed, you can:
- Open the KIDEx IDE to create a new project or explore the examples
- Open one of the example projects directly in Delphi (see below)
- Start developing your own application using
UseKitto.pasand YAML metadata
Option 2: Git Clone (manual installation)
If you prefer to work directly with the source repository, clone from GitHub and compile manually.
Clone the repository
git clone https://github.com/EtheaDev/KittoX.gitRepository structure
KittoX/
  Source/                    # Framework source code
    EF/                      # Entity Framework layer
    ThirdParty/              # Third-party libraries
  Home/                      # System Home (shared resources, templates)
  Packages/                  # Delphi packages, runtime and design-time (D10_4, D11, D12, D13)
  IDE/                       # Sources of the KittoXIDE design-time package
  Examples/
    HelloKitto/              # Simple example
    TasKitto/                # Activity tracking example
    KEmployee/               # Employee management example
Compile the packages
This is a manual step for the Git-clone path — a clone gives you sources only, so you compile the packages yourself, once per Delphi version. (The setup installer already does all of this for you.)
The packages are optional — Kittox has no visual components
Kittox is a source-based, YAML-driven framework: it ships no design-time visual components, so there is nothing to drop on a form or register on the component palette. Your app compiles the framework units directly from source (via the library search path), so you can develop Kittox applications without building or installing any package at all.
Building the packages only enables the KittoXIDE design-time package, which adds two IDE conveniences:
- the New Project Wizard under File → New → Other → KittoX Projects;
- syntax highlighting for YAML files in the Delphi code editor.
KittoXCore / KittoXEnterprise are built mainly because KittoXIDE requires KittoXCore; at runtime your app links the framework statically from source, not from the BPLs.
Always drive the build from the group project Kitto.groupproj in Packages/D13/ (or D10_4, D11, D12): it lists every package in the correct build order and builds them all in one shot.
Open Kitto.groupproj and build the projects in this order (the group already does it for you):
1. Runtime packages:
| Package | Description |
|---|---|
KittoXCore.dproj | Core framework (Apache 2.0) |
KittoXEnterprise.dproj | Enterprise modules — Chart, Calendar, Map, Dashboard (AGPL-3.0 / Commercial) |
Build both for Win32 and Win64 platforms in Release configuration.
2. Build and install the design-time package (optional):
| Package | Description |
|---|---|
KittoXIDE.dproj | The two IDE conveniences only — New Project Wizard + YAML syntax highlighting. No components |
Build for Win32 only (IDE packages are always 32-bit for Delphi up to 12). Right-click and Install to register the wizard and the YAML highlighter in the Delphi IDE. Skip this step if you don't want those two conveniences — it is not required to build or run Kittox applications.
Build packages from the command line (PowerShell)
The framework ships a set of PowerShell scripts in Packages/ that rebuild all the packages (KittoXCore + KittoXEnterprise) for a given Delphi version with a single invocation. Useful when you want to verify the framework still compiles after a svn update, before opening the IDE, or as part of a CI smoke test.
| Wrapper | Delphi | Default platforms | IDE bitness |
|---|---|---|---|
BuildAllPackagesD10_4.ps1 | 10.4 (BDS 21.0) | Win32 only | 32-bit |
BuildAllPackagesD11.ps1 | 11 (BDS 22.0) | Win32 only | 32-bit |
BuildAllPackagesD12.ps1 | 12 (BDS 23.0) | Win32 + Win64 | 64-bit native |
BuildAllPackagesD13.ps1 | 13 (BDS 37.0) | Win32 + Win64 | 64-bit native |
Why D10.4 and D11 stop at Win32: their IDE is a 32-bit application that can only load Win32 design-time BPLs. Win64 design-time was introduced with the 64-bit IDE in D12. Your application's own .dproj of course can still target Win64 — only the framework design-time package is forced to Win32.
Close the Delphi IDE first
The shared Bpl folder under C:\Users\Public\Documents\Embarcadero\Studio\ is locked while the IDE has a design-time package loaded. Close the IDE before running the rebuild scripts, otherwise the Win32 build of KittoXCore will fail with error F2039: Could not create output file '...\KittoXCore370.bpl'.
Examples (run from Packages/):
# Default — Rebuild Release on every valid platform for D13:
.\BuildAllPackagesD13.ps1

# Incremental Build on Win64 only:
.\BuildAllPackagesD13.ps1 -Platform Win64 -Target Build

# Debug Rebuild for D11 (Win32 only — implicit):
.\BuildAllPackagesD11.ps1 -Config Debug

# Override BDS root if your install is non-standard:
.\BuildAllPackagesD12.ps1 -BDSRoot "D:\Embarcadero\Studio"
Each wrapper prints a summary table at the end with package, platform, status and elapsed seconds for every (package × platform) combination it ran. Full per-version logs are saved to Packages/_buildlogs/<version>.log.
The wrappers delegate to the lower-level Packages/BuildPackages.ps1, which can also be invoked directly when you need finer control over a single (-Project, -Platform, -Config, -Target) combination.
Set KITTOX_HOME and the global library path
This is the manual counterpart of what the setup does for you — after a Git clone, do it once:
- Create a
KITTOX_HOMEenvironment variable pointing at the clone root (the folder that containsSource\), e.g.D:\Dev\KittoX. - Add the following entries to the Delphi Library Path (Tools → Options → Language → Delphi → Library → Library Path), for both Win32 and Win64:
$(KITTOX_HOME)\Lib\D13\Win32
$(KITTOX_HOME)\Source\EF
$(KITTOX_HOME)\Source\ThirdParty
$(KITTOX_HOME)\Source\ThirdParty\MarkdownProcessor\source
$(KITTOX_HOME)\Source
Fast link vs. debugging the framework sources
The first entry points at the pre-compiled DCUs produced when you built the packages, so your projects link fast. It is platform-specific — use \Lib\D{ver}\Win32 on the Win32 library path and \Lib\D{ver}\Win64 on the Win64 one. Remove that first entry if you want Delphi to compile from source so you can step into and debug the Kittox framework.
Example projects
The example projects already carry their own search paths, so they compile without touching the global library path — which is only needed for your own projects.
Third-party libraries and the library path
Source\ThirdParty ships in full, but only its root and MarkdownProcessor\source go on the library path: they hold Kitto.-prefixed forks that cannot clash with other copies. The libraries shipped with their upstream unit names in their own subfolders — delphi-neon, delphi-jose-jwt — are not added, so they never override a version you already have. Add their Source folders to the search path of the projects that need them (e.g. the JWT envelope needs delphi-jose-jwt\Source\Common and \Source\JOSE), as the example projects do. See Licensing.
Compile and run an example
Each example has four deployment projects in its Projects/ directory:
| Project | Mode |
|---|---|
HelloKitto.dpr | Standalone (GUI / Windows Service) |
HelloKittoDesktop.dpr | Desktop Embedded (WebView2) |
HelloKittoISAPI.dpr | ISAPI DLL for IIS |
mod_hellokitto.dpr | Apache module |
To get started quickly:
- Open
Examples/HelloKitto/Projects/HelloKitto.dprin Delphi - Set the target platform to Win64
- Build and Run
- The application starts an HTTP server on the port configured in
Config.yaml(default 3621) - Open
http://localhost:3621/hellokittox/in a browser - Log in with the default credentials (see
Config.yaml→Auth/.Defaults)
See the HelloKitto, TasKitto, and KEmployee pages for details on each example, and the Deployment guide for IIS and Apache setup.
Build examples from the command line
A build script is provided to compile all examples (or a selection) in all deployment modes without opening the Delphi IDE.
Run from the Examples/ directory:
cd Examples
build_Examples.cmd
The script will:
Ask for the Delphi BDS path (default:
C:\BDS\Studio\37.0). It initializes the compiler environment usingrsvars.batfrom the BDS installation — no manual environment variables needed.Ask which examples to build:
- All (HelloKitto + TasKitto + KEmployee)
- A single example by name
Ask which deployment modes to build:
- All (Desktop, ISAPI, Apache, Embedded)
- Or a single mode:
Mode Platform Output Desktop (Standalone) Win64 Home/{AppName}.exeISAPI (IIS) Win64 Home/{AppName}ISAPI.dllApache Module Win32 Home/mod_{appname}.dllWindows Embedded Win64 Home/{AppName}Desktop.exeBuild each selected project using
msbuildin Release mode, with separate log files per build (e.g.HelloKitto_Desktop.log,TasKitto_Apache.log).Report results with a summary of successes and failures. Check the
.logfiles in eachProjects/folder for detailed build output.
Apache module requires Win32
Apache modules must be compiled for the same bitness as the Apache server. Most Apache 2.4 installations on Windows are 32-bit, so the build script uses Win32 for Apache modules. If your Apache is 64-bit, change the platform in the script or compile manually.
Next steps
- Getting Started — create your first application
- Basic Concepts — YAML metadata, models, views
- Deployment — standalone, IIS, Apache, desktop embedded
- Kittox Enterprise — KIDEx IDE, charts, calendar, dashboard